나도코딩 [기본편]
| 공부 & 정리
0 ~ [1-2] : 생략
[2-1] 숫자 자료형
양수, 음수, 소수등 다양한 수를 출력
| Code
print(__)
[2-2] 문자열 자료형
문자를 출력
작은 따옴표, 큰 따옴표를 사용
문자열과 정수를 함께 사용해서 출력도 가능
| Code
print(“영웅”*3)
[2-3] Boolean 자료형
(참 / 거짓) 표현하는 자료형
| Code
print(not (5>10))
not은 값의 반대로 뒤집는 것
[2-4] 변수
쉽게 설명하면 값을 저장하는 공간
( + ), ( , ) 이 2가지 사용이 가능하다.
( , )은 str(int, boolean type) 없이도 사용 가능
But ( , )은 한칸 여백이 생긴다
같은 변수에 다른 값을 넣으면 바뀐다.
| Code
# 친구 소개

name = "Sangwon"
age = 24
sex = "Male"
hobby = "Football"
is_20s =  30> age >=20

print ( name + " is " + str(age) + "year old " + sex )
print ( name + "'s hobby is " + hobby )
print ( "Is " + name + " in his 20s? " + str(is_20s) )
[2-5] 주석
코드에는 포함이 되었지만 실행은 되지 않는 것
(#), (''')
단축키 : Ctrl + /
주로 소통을 위해서 혹은 복잡한 코드 라인에 대한 설명을 위해 사용
+ 작은 따옴표(혹은 큰 따옴표)를 쓰는 주석 방법은
코드 앞쪽에 작은 따옴표를 쓰면 작은 따옴표로,
큰 따옴표를 쓰면 큰 따옴표로 마무리 해야함
| Code
# 앞에 샾을 붙임으로써 주석 처리가 된다

print("빈 공간은 빈 공간이다")

'''
여러 줄을 주석을 할 때는
작은 따옴표 혹은 큰 따옴표를 3개를 쓰는 방법과
일괄 선택 후 [Ctrl + /] 단축키도 있다
'''
[2-6] 퀴즈 #1
| Quiz
변수를 이용하여 다음 문장을 출력
| 변수명
station
| 변수값
"사당", "신도림", "인천공항" 순서대로 입력
| 출력 문장
XX행 열차가 들어오고 있습니다.
| 내 코드
station = "사당"
print(station + "행 열차가 들어오고 있습니다.")
station = "신도림"
print(station + "행 열차가 들어오고 있습니다.")
station = "인천공항"
print(station + "행 열차가 들어오고 있습니다.")
[3-1] 연산자
| 연산자 | 비교 연산자 | 논리 연산자 | |||
| + | 더하기 | > | 크다 (초과) | and | AND (논리곱) 양쪽 모두 참일 때 참 |
| - | 빼기 | < | 작다 (미만) | ||
| * | 곱하기 | >= | 크거나 같다 (이상) | or | OR (논리합) 양쪽 중 한쪽만 참이라도 참 |
| / | 나누기 | <= | 작거나 같다 (이하) | ||
| ** | 제곱 | == | 같다 | not | NOT (논리부정) 참, 거짓을 뒤집음 |
| % | 나머지 구하기 | != | 같지 않다 | ||
| // | 몫 구하기 | is | 객체가 같다 | ||
| is not | 객체가 같지 않다 | ||||
[3-2] 간단한 수식
# ( )를 통해서 우선 순위
print(2+3*4) #14
print((2+3)*4) #20

# 변수에 넣고 출력
number = 2+3*4
print(number)

# 두 개의 코드줄은 같은 수행
number = number + 2 #16
number += 2 #18

    '''
    number -=
    number *=2
    number /=2
    number %=2
    '''
[3-3] 숫자 처리 함수
print(abs(-10)) #절댓값, 10
print(pow(5,2)) #제곱, 5^2, 25
print(max(5,12,37)) #최대값, 37
print(min(5,12,37)) #최솟값, 5
print(round(3.14)) #반올림, 3
print(round(3.97)) #반올림, 4

#Python이 제공하는 Math 라이브러리 이용하는 방법

from math import * # Math 라이브러리 불러오는

print(floor(3.99)) #내림, 3
print(floor(3.14)) #올림, 4
print(sqrt(16)) #제곱근, 4
[3-4] 랜덤 함수
랜덤 함수 : 무작위(난수)로 숫자를 뽑아주는 것
랜덤 라이브러리를 사용할 수 있다
# 랜덤 라이브러리 호출
from random import *

print(random()) # 0.0 ~ 1.0 미만의 임의의 값 생성
print(random()*10) # 0.0~10.0 미만의 임의의 값 생성
print(int(random()*10)) # 0~10 미만의 임의의 값 생성
print(int(random()*10)+1) # 1~10 이하의 임의의 값 생성

#로또 번호 예시
print(int(random()*45)+1) # 1~45 이하의 임의의 값 생성

#randrange / 앞에 숫자는 포함, 뒤는 미포함
print(randrange(1,46)) # 1~46 미만의 임의의 값 생성

#randint / 앞, 뒤 숫자 모두 포함
print(randint(1,45)) # 1~45 이하의 임의의 값 생성
[3-5] 퀴즈 #2
| Quiz
스터디 모임이 있다.
월 4회 스터디를 하는데
3번은 온라인으로 하고 1번은 오프라인으로 하기로 했다.
아래 조건에 맞는 오프라인 모임 날짜를 정해주는 프로그램을 작성해라
조건1 : 랜덤으로 날짜를 뽑아야 함
조건2 : 월별 날짜는 다름을 감안, 최소 일수인 28 이내로 정함
조건3 : 매월 1~3일은 스터디 준비를 위해 제외
출력문 예제 :
오프라인 스터디 모임 날짜는 매월 X일로 선정되었습니다.
| 코드
from random import *
ofdate = randint(4,28)
print("오프라인 스터디 모임 날짜는 매월 " + str(ofdate) +"일로 선정되었습니다")
[4-1] 문자열
# 작은 따옴표를 이용한 문자열
sentence = '배가 고프다'

# 큰 따옴표를 이용한 문자열
sentence2 = "목이 마르다"

# 큰 따옴표 3개를 이용한 문자열
	# 여러줄(줄바꿈)도 출력이 된다
sentence3 = """
배가 고프다,
목이 마르다
"""
[4-2] 슬라이싱
기호 모양 : [ ] ( 범위를 정할 때는 ":" 사용 )
컴퓨터에서는 인덱스가 0부터 시작한다.
( ESP. 문자열에서 첫번째 문자가 0번째 )
idNum = "990616-1234567"

print("SEX : " + idNum[7])
print("Year : " + idNum[0:2]) # 0부터 2 직전까지 (0,1)
print("Month : " + idNum[2:4])
print("Day : " + idNum[4:6])

print("Date of Birth : " + idNum[:6]) # 처음부터 6 직전까지
print("ID Number : " + idNum[7:]) # 7부터 끝까지
print("ID Number(뒤에부터) : " +idNum[-7:])
# 맨 뒤에서 7번째부터 끝까지
[4-3] 문자열 처리 함수
다양한 문자열을 다루는 함수들이 존재한다
python = "Python is Amazing"

#소문자로 변경하는 .lower() 함수
print(python.lower())
#대문자로 변경하는 .upper() 함수
print(python.upper())
#대문자인지 확인하는 [확인하려는 문자].isupper() 함수
print(python[0].isupper())
#문자열의 길이를 확인하는 len() 함수
print(len(python))
#문자열의 부분을 바꾸는 .replace(바뀌는 문자열, 새로운 문자열)함수
print(python.replace("Python", "Java"))

##문자가 있는지 확인하는 index("찾는 문자열", 시작점) 함수
index = python.index("n")
    print(index)
index = python.index("n", index + 1)
    print(index)

#문자가 있는지 확인하는 .find("찾는 문자열") 함수
print(python.find("Java"))

# index와 find 함수의 차이점
#     index는 찾는 문자가 문자열에 없을 시 error 출력 ( 다음 코드 출력 X )
#     find는 찾는 문자가 문자열에 없을 시 -1 출력 ( 다음 콛코드 출력 O )
print(python.find("Java"))
print(python.index("Java"))
[4-4] 문자열 포맷
문자열 포맷을 지정하는 다양한 방식이 있다
%s로만 사용하면 정수, 문자 관계 없이 모두 출력 가능
#(+), (,)을 사용한 방식
    print("a" + "b")
    print("a","b")

# 방법 1
    print("I am %dyears old" % 20) #d는 정수를 뜻한다. 정수값만 사용 가능
    print("I like %s" % "python") #s는 문자열을 뜻한다.
    print("Apple starts with %c" % "A") #c는 문자를 뜻한다. 문자만 사용 가능

    # %s만 사용하면, 자료형 구분 없이 사용 가능
    print("I am %syears old" %20)

    # %s 사용시 1개 이상이 쓰일 때
    print("I like %s color and %s color" %("Blue", "Red")) #순서대로 대입, 소괄호 사용

# 방법 2
    print("I am {}years old".format(22))
    print("I like {} color and {} color".format("Blue", "Red"))
        # 중괄호 안에 숫자를 바꾸면 순서를 바꿀 수 있음
        print("I like {0} color and {1} color".format("Blue", "Red"))
        print("I like {1} color and {0} color".format("Blue", "Red"))

# 방법 3
    print("I am {age}years old and like {color} color".format(age = 22, color = "Red"))
    print("I am {age}years old and like {color} color".format(color = "Red", age = 22))
    # 뒤에서 순서가 바뀌어도 변수에 맞추어서 들어감

# 방법 4
	age = 22
	color = "Red"
	print(f"I am {age}years old and like {color} color")
[4-5] 탈출 문자
# \n : 줄바꿈
    	print("What I was Trying\nto Say is")

# \" \' : 문장 내에서 따옴표
    # 출력하려는 문장 : 저는 "히어로"입니다.
    # "와'를 같이 쓰면 되긴하지만
    # 둘 다 "로 혹은 '로 쓰려고 할 때 \", \'
        print("저는 '히어로'입니다.")
        print('저는 "히어로"입니다.')
        print("저는 \"히어로\"입니다.")
        print("저는 \'히어로\'입니다.")

# \\ : 문장 내에서 \
        print("C:\Users\Herocoding\Desktop\PythonWorkspace>") #Error
        print("C:\\Users\\Herocoding\\Desktop\\PythonWorkspace>")

# \r : 커서를 맨 앞으로 이동\
    # 출력 결과 : PineApple
        print("Red Apple\rPine")

# \b : 한 글자 삭제 (백스페이스)
        print("Redd\bApple")

# \t : 탭
        print("Red\tApple")
[4-6] 퀴즈 #3
| Quiz
사이트 별로 비밀번호를 만들어 주는 프로그램을 작성
예 : http://naver.com
규칙 1 : http:// 부분은 제외 => naver.com
규칙 2 : 처음 만나는 점(.) 이후 부분은 제외 => naver
규칙 3 : 남은 글자 중 처음 세자리 + 글자 갯수 + 글자 내 'e' 갯수 + '!'로 구성
예 결괴 : 생성된 비밀번호 : nav51!
| 내 코드
#내 코드
	add = "http://naver.com"

	afsub1 = add[7:] # naver.com
	afsub2 = afsub1[:5] # naver

	# final slicing, str
	finalr = afsub2[:3]
	# length, int
	lenr = len(afsub2)
	# letter count, int
	countr = afsub2.count("")
	#!

	pword = finalr + str(lenr) + str(countr) + "!"

	print(pword)

#Clean Code
	url = "http://naver.com"
	# 규칙 1
	my_str = url.replace("http://", "")
	# 규칙 2
	my_str = my_str[:my_str.index(".")]
	pword = my_str[:3] + str(len(my_str)) + str(my_str.count("e")) + "!"

	print("{urlf}의 비밀번호는 {password}입니다.".format(urlf=url, password = pword))
| 반성점
1. 슬라이싱만 사용하지 않고 replace() 함수를 사용함으로써 http://를 대체한다는 더욱 직관적인 코드가 된다.
2. 규칙2 코드에서 슬라이싱 안에 index[] 함수를 씀으로써 간결한 코드가 완성되었다.
3. 출력 코드에서 문자열 포맷을 씀으로써 이후 더욱 직관적인 코드가 된다.
[5-1] 리스트
#지하철 예시
	# 지하철 칸마다 타고 있는 인원들
	subway = ["Joo", "Do", "Hero"]

	# 어떤 지하철 칸에 타고 있는지
	print(subway.index("Do"))

	# So가 지하철 다음 칸에 탐
	subway.append("So")

	# Seo를 Joo와 Do 사이에 태워봄
	subway.insert(1,"Seo")

	# 지하철에 있는 사람을 한 명씩 뒤에서 꺼냄
	subway.pop()
	print(subway)

    # 같은 이름의 사람이 몇명 있는지
    subway.append("So")
    print(subway.count("So"))

#다른 예시
	num_list = [5,2,4,3,1]

    # 정렬
    num_list.sort()

    # 순서 뒤집기
    num_list.reverse()

    # 모두 지우기
    num_list.clear()

    # 다양한 자료형 함께 사용
    mix_list = ["So", 21, True]

    # 리스트 확장
    num_list.extend(mix_list)
[5-2] 사전
#사전
cabinet = {19:"So", 29:"Joo", 22:"Hero"}

#출력 방법
	print(cabinet[22])
	print(cabinet.get(19))

# 값이 없을 때
	# Error 발생, 코드 멈춤
	print(cabinet[20])
	# Error X, 코드 진행
	print(cabinet.get(20))
	print(cabinet.get(20, "Available")) # (키값, 출력문)

# 값이 있는지 확인하는 방법
	print(19 in cabinet) #True
	print(20 in cabinet) #False

# 값을 추가(혹은 대체)
	# Key에 기존 Value가 없으면 추가
	cabinet[20] = "Dae"
	# Key에 기존 Value가 있으면 대체
	cabinet[22] = "Seo"

# 값을 삭제
	del cabinet[20]

# Key 혹은 Value들(만) 모두 출력
	print(cabinet.keys()) #Key만
	print(cabinet.values()) #Value만
	print(cabinet.items()) #Key, Value 모두

# 딕셔너리 내에 모두 지우기
	cabinet.clear()

# Key는 정수형이 아닌 문자형도 가능
	cabinet = ["A" : "Hero", "B" : "Sona"]

# Note
'''
Key-Value 형태 / 중괄호로 생성, { }
Key에 대한 중복이 허용되지 않는다
'''
[5-3] 튜플
# Note
리스트와는 다르게 내용 변경/추가 불가능
BUT 속도가 리스트보다 빠름 (고로 변경되지 않는 리스트에 주로 사용)

# 튜플의 형태
menu = ("등심가츠", "치즈가츠") # 소괄호, 콤마로 구분

# 값 출력
print(menu[0])

# 다른 사용 예시
name = "Hero"
age = 22
height = 183
print(name,age,height)
#>
(name, age, hobby) = ("Hero", 22, 183)
[5-4] 세트
# 집합(Set)
# 중복 안됨, 순서 없음

my_set = {1,2,3,3,3}
print(my_set)

# 교집합
java = {"So", "Joo", "Ung"}
python = set(["Ung", "Dong"])
print(java & python)
print(java.intersection(python))

# 합집합
print(java | python)
print(java.union(python))

# 차집합
print(java-python)
print(java.difference(python))

# 추가
python.add("So")
print(python)

# 제거
java.remove("Ung")
print(java)
[5-5] 자료구조의 변경
# 자료구조의 변경

# Ex
menu = {"Cofee", "Milk", "Juice"}
print(menu, type(menu))
# 출력 : {"Cofee", "Milk", "Juice"} <class 'set'>

menu = list(menu)
print(menu, type(menu))
# 출력 : ["Cofee", "Milk", "Juice"] <class 'list'>

menu = tuple(menu)
print(menu, type(menu))
# 출력 : ("Cofee", "Milk", "Juice") <class 'tuple'>
[5-6] 퀴즈 #4
| Quiz
파이썬 코딩 대회를 주최한다.
참석률을 높이기 위해 댓글 이벤트를 진행한다.
댓글 작성자들 중 추첨을 통해 1명은 치킨, 3명은 커피 쿠폰을 받는다.
추첨 프로그램을 작성하시오.
조건1 : 댓글은 20명이 작성했고, 아이디는 1~20이라고 가정
조건2 : 댓글 내용과 상관 없이 무작위로 추첨, 중복 불가
조건3 : random 모듈의 shuffle과 sample을 활용
[ 출력 예제 ]
-- 당첨자 발표 --
치킨 당첨자 : 1
커피 당첨자 : [2,3,4]
-- 축하합니다 --
[ 활용 예제 ]
from random import *
lst = [1,2,3,4,5]
print(lst)
shuffle(lst)
print(lst)
print(sample(lst,1))
| 내 코드
import random

students = [1,2,3,4,5,6,7,8,9,10,11,12,13,14,15,16,17,18,19,20]

random.shuffle(students)

winner = random.sample(students,4)

print("-- 당첨자 발표 --")
print("치킨 당첨자 :", winner[0])
print("커피 당첨자 :", winner[1:])
print("-- 축하합니다 --")
| Clean Code (From the Vid)
from random import *

users = range(1,21) # 1부터 20까지 숫자 생성
users = list(users) # range 타입에서 list로 변환

shuffle(users)

winners = sample(users,4) # 4명은 뽑아두어야 중복 X

print("--당첨자 발표--")
print("치킨 당첨자 : {0}".formant(winners[0]))
print("치킨 당첨자 : {0}".formant(winners[1:]))
print("--축하합니다--")
| 반성점
우선 range 함수를 사용하지 않은 점, 숫자가 훨씬 많아지면 어떻게 할 것인가에 대한 고민이 부족했다.
중복을 뽑지 않기 위한 4명 먼저 뽑는 프로세스를 고려하지 않은 점
format을 쓰지 않은 점
[6-1] if
# if문

'''
- input은 항상 문자열로 값을 받는다
- or은 조건 중 하나면 맞으면 될 때,
- and는 조건 모두가 맞아야 할 때
- and 대신 10 <= temp < 30 이런 식으로도 가능하다
'''

# 날씨 예시

weather = input("Weather Status : ")
if weather == "rain" or weather == "snow" : # 두 가지 조건을 사용 시 or
    print("Take umbrella")
elif weather == "particulates" :
    print("Wear Mask")
else:
    print("Good to go")

# 온도 예시

temp = int(input("Temperature Status : "))
if 30 <= temp :
    print("Extremely Hot")
elif 10 <= temp and temp < 30 :
    print("Great Weather")
elif 0 <= temp < 10 :
    print("Cold Weather")
else :
    print("Freezing")
[6-2] for
반복문의 역할을 하는 for문
# 예시 1
# for문에서 범위 설정 후 출력하는 것
for waiting_no in range(1,6) :
	print("{0} groups waiting befor you".format(waiting_no))

# 예시 2
# 리스트를 만들고 그것을 반복문에 넣어서 출력하는 것
hq = ["Jung", "Ung", "Lee", "Suk"]
for starbucks_cust in hq:
        print("{0}, your order is ready.".format(starbucks_cust))
[6-3] while
# while문
# 조건이 True일 동안은 계속 실행된다.

# while Ex

customer = "Hero"
index = 5

while index >= 1:
    print("{0}, coffee is ready, {1} more left for the call".format(customer, index))
    index -= 1
    if index == 0:
        print("{0}, due to your miss, coffee will be disposed".format(customer))

# Infinite loop

customer = "Hero"
index = 1

while True:
    print("{0}, coffee is ready, {1} times called".format(customer, index))
    index += 1

# finite loop with input

customer = "Hero"
person = "Unknown"

while person != customer :
    print("{0}, coffee is ready".format(customer))
    person = input("What's your name? ")
[6-4] continue와 break
continue을 만나게 되면 실행을 하지않고 다음 반복으로,
break는 바로 반복문을 끝내는 것을 의미
# continue와 break문에 대한 예시
# 책을 읽으라고 시키는 상황
# 결석한 인원은 넘어간다
# 책을 안 가지고 온 인원은 혼내고 그것을 위해 수업을 끝낸다

absent = [2,5]
no_book = [7]
for student in range (1,12) :
    if student in absent :
        continue
    elif student in no_book :
        print("Class is over. {0}, follow me to the office".format(student))
        break
    print("{0}, Keep reading".format(student))
[6-5] 한 줄 for
# 예시들

# 출석 번호가 1 ~ 5, 앞에 100을 붙일 것 > 101 ~ 105
students = [1,2,3,4,5]
print(students)
students = [i+100 for i in students]
print(students)

# 학생 이름을 길이로 변환
students = ["Sofia", "Hero", "Ung"]
students = [len(i) for i in students]
print(students)

# 학생 이름을 대문자로 변환
students = ["Sofia", "Hero", "Ung"]
students = [ i.upper() for i in students ]
print(students)
[6-6] 퀴즈 #5
| Quiz
Sober 서비스를 이용하는 택시 기사이다.
50명의 승객과 매칭 기회가 있을 때, 총 탑승 승객 수를 구하는 프로그램을 정해라.
조건1 : 승객별 운행 소요 시간은 5~50분 사이의 난수로 정한다.
조건2 : 소요 시간 5~15분 사이의 승객만 매칭해야 한다.
[ 출력 예제 ]
[0] 1번째 손님 (소요시간 : 15분)
[0] 2번째 손님 (소요시간 : 50분)
...
[0] 50번째 손님 (소요시간 : 16분)
총 탑승 승객 : 2분
| 내 코드
from random import randint

customer = range(1,51)
customer = list(customer)
total_count = 0

for i in customer :
    tspent = randint(5,50)
    if 5 <= tspent <= 15 :
        print("[O] {0}, Customer ( Time Spent : {1})".format(i,tspent))
        total_count +=1
    else :
        print("[] {0}, Customer ( Time Spent : {1})".format(i,tspent))

print(" Total Customer Taken :", total_count)
| Clean Code (From the V)
from random import randint

cnt = 0 # 총 탑승 승객 수
for i in range(1,51) : # 1~50이라는 수 (승객)
    time = randrange(5,51) # 5분~50분 소요 시간
    if 5 <= tspent <= 15 : # 5분~15분 이내의 손님 (매칭 성공), 탑승 승객 수 증가 처리
        print("[O] {0}, Customer ( Time Spent : {1})".format(i,time))
        cnt +=1
    else : # 매칭 실패한 경우
        print("[] {0}, Customer ( Time Spent : {1})".format(i,time))

print(" Total Customer Taken : {0}".format(cnt))
[7-1] 함수
# 함수를 정의하는 것
def open_account():
    print("New account created")

# 함수를 출력하려면 정의한 함수를 한번 더 작성
open_account()
[7-2] 전달값과 반환값
함수에는 전달값이 없는 경우도, 전달 & 반환값이 있는 경우도 있다
#함수 정의 문단

def deposit(balance, money) : #입급
    print("Deposit fulfilled. Total balance is {0}".format(balance+money))
    return balance + money

def withdrawal(balance, money) : #출금
    if balance >= money : # 잔액이 출금보다 많으면
        print("Withdrawal fulfilled. Total balance is {0}".format(balance-money))
        return balance - money
    else : # 잔액이 출금보다 낮으면 (출금 못하니까)
        print("Withdrawal failed. Total balance is {0}".format(balance))
        return balance

def withdrawal_night(balance, money) : # 저녁 출금으로 인한 수수료 부과
    commission = 10 # 수수료
    if balance >= money+commission :
        print("Withdrawal fulfilled. Commission {0} charged. Total balance is {1}".format(commission,balance-(money+commission)))
        return commission, balance - (money+commission)
    else :
        print("Withdrawal failed. Total balance is {0}".format(balance))
        return balance

balance = 0
balance = deposit(balance, 400)
balance = withdrawal_night(balance, 100)
[7-3] 기본값
# 기존 방식

def profile(name, age, main_lang):
    print("Name: {0}\t Age: {1}\t Main Language: {2}".format(name, age, main_lang))

profile("Joo", 25, "Java")
profile("Seo", 25, "Python")

# 기본값 설정

def profile(name, age=25, main_lang="Python"):
    print("Name: {0}\t Age: {1}\t Main Language: {2}".format(name, age, main_lang))

profile("Joo")
profile("Seo")
[7-4] 키워드값
def profile(name, age, main_lang):
    print("Name: {0}\t Age: {1}\t Main Language: {2}".format(name, age, main_lang))

profile(name="Joo", main_lang="Java", age=25)
profile(main_lang="Java", name="Joo", age=25)

# 키워드값을 통해서 입력을 순서대로 하지 않아도 정상적으로 실행된다
[7-5] 가변인자
가변의 사전적 정의 : 형태나 성질이 바뀌기 쉬움
# 가변인자를 쓰지 않을 때
	# 비효율적으로 비어있는 변수를 작성하거나 매번 함수를 수정해야 함
def profile (name, age, lang1, lang2, lang3, lang4, lang5):
    print("Name: {0}\t Age: {1}\t".format(name, age), end="")
    print(lang1, lang2, lang3, lang4, lang5)

profile("Sona", 19, "Python", "Java", "C#", "C", "C++")
profile("Ung", 22, "Python", "Java", "", "", "")

# 가변인자를 쓸 때
# 원하는 수만큼 변수를 작성해도 된다
# 그리고 반복문을 통해서 출력을 한다

def profile (name, age, *language):
    print("Name: {0}\t Age: {1}\t".format(name, age), end="")
    for lang in language:
        print(lang, end="")
    print()

profile("Sona", 19, "Python", "Java", "C#", "C", "C++")
profile("Ung", 22, "Python", "Java")
profile("Joo", 19, "Python", "Java", "C#", "C", "C++", "Swift", "Go")

# +
# end="" 를 사용해서 줄바꿈을 안한다
[7-6] 지역변수와 전역변수
지역변수 : 함수 내에서만 쓰이는 변수. 함수 호출 시 생성, 끝나면 사라짐
전역변수 : 모든 지역, 프로그램 내 어디서도 호출이 가능한 변수
일반적으로 전역변수를 많이 쓰면 코드관리가 어려워지니 권장되는 방법은 아님.
가급적 함수의 전달값으로 계산하고, 반환값을 이용해서 사용하는 방법
gun = 10

# [오류] 지역변수에 할당이 안되었기 때문에 실행이 안됌
def checkpoint(soldiers): # 경계근무
	# gun = 20
    	# 이런 식으로 추가하면 출력은 되지만 지역 변수 내의 gun을 출력하는 것
        # 위 gun을 출력하는 것이 아님
    gun = gun - soldiers
    print("[In Def] Remaining Gun :{0}".format(gun))

print("Total Gun: {0}".format(gun))
checkpoint(2) # 2명 경계근무 나감
print("Remaining Gun: {0}".format(gun))

# 전역변수를 가져오는 global을 이용한 방법
def checkpoint(soldiers):
    global gun
    gun = gun - soldiers
    print("[In Def] Remaining Gun :{0}".format(gun))

print("Total Gun: {0}".format(gun))
checkpoint(2) # 2명 경계근무 나감
print("Remaining Gun: {0}".format(gun))

# 함수의 전달값, 반환값을 이용한 방법
def checkpoint_ret(gun, soldiers):
    gun = gun - soldiers
    print("[In Def] Remaining Gun :{0}".format(gun))
    return gun

print("Total Gun: {0}".format(gun))
gun = checkpoint_ret(gun,2)
print("Remaining Gun: {0}".format(gun))
[7-7] 퀴즈 #6
| Quiz :
주제 : 표준 체중을 구하는 프로그램을 작성하시오
		* 표준 체중 : 각 개인의 키에 적당한 체중

[성별에 따른 공식] :
	남 : 키(m) X 키(m) X 22
	여 : 키(m) X 키(m) X 21

조건 :
    조건 1 : 표준 체중은 별도의 함수 내에서
        * 함수명 : std_weight
        * 전달값 : 키(height), 성별(gender)
    조건 2 : 표준 체중은 소수점 둘째자리까지 표시

출력 예제 :
키 175cm 남자의 표준 체중은 67.38kg입니다.
| 내 코드
def std_weight(height, gender) :
    if gender == "Male" :
        male_std_weight = (height/100)*(height/100)*22
        print("{0}cm Male's standard weight is {1}".format(height, round(male_std_weight,2)))
    elif gender == "Female" :
        female_std_weight = (height/100)*(height/100)*21
        print("{0}cm Female's standard weight is {1}".format(height, round(female_std_weight,2)))
    else :
        print("Wrong Input")

std_weight(175, "Male")
| Clean Code ( from the vid )
def std_weight(height, gender) : # 키: m 단위 (실수), 성별: "Male"/"Female" (문자열)
    if gender == "Male" :
        return height*height*22
    else :
        return height*height*21

height = 175 # cm 단위
gender = "Male"
weight = round(std_weight(height/100, gender), 2) # cm 단위로 키를 받았기 때문에 /100을 한다
print("{0}cm {1}'s standard weight is {2}".format(height, gender, weight))
| 반성점
1. 특정 자릿수에서 소수점으로 반올림하는 방식 미숙지 :
round(반올림하는 값, 자릿수)
2. 함수 내 너무 긴 코드 :
함수 밖에서 변수값을 지정을 하고 출력문을 작성하지 않고
함수 내에서 모두 완료시키다보니 함수 내 너무 긴 코드가 작성
의도의 차이로 볼 수 있는지 혹은 틀린 것인지에 대한 고민이 요망
[8-1] 표준 입출력
# sep는 변수들 사이에 (,) 대신 무엇이 들어가는지,
# end는 기존의 줄바꿈 대신 무엇이 들어가는지
print("Python", "Java", "C#", sep="VS", end="?")
print("Which is better")

# 출력에 차이가 없어보이지만, 사실 표준출력과 표준에러로 둘은 다르다
# 로그 처리시 표준출력과 다르게 표준에러는 확인을 하고 처리해야한다
import sys
print("Python", "Java", file = sys.stdout) #표준출력
print("Python", "Java", file = sys.stderr) #표준에러

# 시험 성적 | 출력 포맷
scores = {"Math":97, "English":100, "Coding":99}
for subject, score in scores.items():
    # print(subject, score)
    	# 변수명에 상관 없이 순서대로 배정이 되는 것이다
    	# subject, score 대신 a, b 가능
    print(subject.ljust(8), str(score).rjust(4), sep = ":")
    	# ljust() = 왼쪽, rjust() = 오른쪽 / 소괄호 안은 확보하는 공간
        # score를 문자열로 변환한 것은 ?just() 함수가 문자열에만 적용 가능

# 은행 대기순번표
# 001, 002, 003, ...
for num in range (1, 21) :
    print("Waiting : ", str(num).zfill(3))
    	# zfill(확보하는 공간) > 확보하는 공간 외를 0으로 채우는 것

# 표준 입력
answer = input("Type any value : ")
print("The typed value is " + answer)
    # 사용자 입력을 받을 때는 항상 문자열로 받기 때문에
    # 숫자가 들어와도 문자열 변환이 필요 없다
[8-2] 다양한 출력 포맷
# (1) 빈 자리는 빈 공간 | (2) 오른쪽 정렬 | (3) 총 10자리 공간 확보
print("{0: >10}".format(500))
        # (:)와 (>) 사이 빈 공간은 (1)
        # (>)은 (2)
        # (10)은 (3)

# 양수일 땐 +로 표시, 음수일 땐 =로 표시
print("{0: >+10}".format(500))
print("{0: >+10}".format(-500))
	# (>)와 (숫자) 사이에 (+)만 추가

# 왼쪽 정렬, 빈칸을 _로 채움
print("{0:_<10}".format(500))
	# (:) 와 (<) 사이에 채우고 싶은 것을 추가

# 3자리마다 콤마를 찍기
print("{0:,}".format(10000000))

# 3자리마다 콤마, 부호 붙이기, 왼쪽 정렬, 자릿수 확보, 빈 자리는 ^
print("{0:^<+30,}".format(10000000))

# 소수점 출력
print("{0:f}".format(5/3))

# 소수점 특정 자릿수까지만 표시 ( 예제에서는 3번째 자리에서 반올림 )
print("{0:.2f}".format(5/3))
[8-3] 파일 입출력
컴퓨터에는 수많은 파일이 있다.
파이썬을 통해서 파일을 불러올 수도, 원하는 내용을 작성할 수도 있다.
# 1. 파일에 내용을 쓰는 것

# utf8은 한글을 원활하게 출력하기 위한
# w는 write을 나타내고, 파일에 내용을 쓴다는 것
score_file = open("score.txt", "w", encoding="utf8")
print("Math : 0", file=score_file)
print("English : 50", file=score_file)
score_file.close()

# a는 append를 나타내고, 파일에 내용을 추가한다는 것
# \n을 쓴 이유는 print와 다르게 .write 사용시 줄바꿈이 이뤄지지 않음
score_file = open("score.txt", "a", encoding="utf8")
score_file.write("Science : 80")
score_file.write("\nCoding : 100")
score_file.close()

# 2. 파일의 내용을 읽어오는 것

# r은 read를 나타내고, 파일을 읽는다는 것
# file.read()를 사용하면 모든 내용을 불러온다
score_file = open("score.txt", "r", encoding="utf8")
print(score_file.read())
score_file.close()

# file.readline()은 한줄씩 출력하는 것
# end=""를 추가한 이유는 줄 바꿈을 없애려고 추가
score_file = open("score.txt", "r", encoding="utf8")
print(score_file.readline(), end="")
print(score_file.readline(), end="")
print(score_file.readline(), end="")
print(score_file.readline(), end="")
score_file.close()

# 파일의 얼마나 많은 줄이 있을지 모를 때
# while문을 통해서 출력을 한다
score_file = open("score.txt", "r", encoding="utf8")
while True :
    line = score_file.readline()
    if not line :
        break
    print(line)
score_file.close()


# 리스트 형태로 저장 후 반복문으로 출력을 할 때
score_file = open("score.txt", "r", encoding="utf8")
lines = score_file.readlines() # list
for line in lines :
    print(line, end="")
score_file.close()
[8-4] Pickle
프로그램에서 사용하는 데이터를 파일 형태로 저장,
그 후 파일을 피클을 이용해서 사용할 수 있는 것
텍스트 상태의 데이터가 아닌 파이썬 객체 자체를 바이너리 파일로 저장하는 것
텍스트 형태의 파일이 아닌 딕셔너리, 리스트, 튜블과 같은 형태로 필요한 부분을 저장,
BUT 문자열이 아닌 객체를 파일에 쓸 수 없기 때문에 picke 모듈을 활용해 객체 자체를 바이너리로 저장하는 것
# Using Pickle

# 파일 저장

import pickle
profile_file = open("profile.pickle", "wb")

profile = {"Name":"Kim", "Age":22, "Hobby":["Football","Table Tennis", "Workout"]}
pickle.dump(profile, profile_file) # profile에 있는 정보를 file에 저장

profile_file.close()

# 파일 로드
profile_file = open("profile.pickle", "rb")
profile = pickle.load(profile_file) # file에 있는 정보를 profile에 불러오기
print(profile)
profile_file.close()

'''
사용법
    pickle 파일 저장
        pickle.dump(객체, 파일)
	pickle 파일 저장
    	pickle.load(파일)
'''
[8-5] with
with를 쓰면 열고 닫는 것을 더욱 편하게 동일한 작업이 가능하다
# with를 이용한 파일 생성, 읽기
	# 열었던 파일을 닫을 필요 없이 with문이 종료되며 자동으로 닫힌다
with open("study.txt", "w", encoding="utf8") as study_file :
    study_file.write("Studying Python")

with open("study.txt", "r", encoding="utf8") as study_file :
    print(study_file.read())

# pickle의 경우
import pickle

with open("profile.pickle", "rb") as profile_file :
    print(pickle.load(profile_file))
[8-6] 퀴즈 #7
| Quiz :
주제 :
	회사에서는 매주 1회 작성해야 하는 보고서가 있다.
	보고서는 항상 아래와 같은 형태로 출력되어야 한다
보고서 형태 :
    - X주차 주간보고 -
    부서 :
    이름 :
    업무 요약 :
과제 :
	1주차부터 50주차까지의 보고서 파일을 만드는 프로그램을 작성
조건 :
	파일명은 '1주차.txt', '2주차.txt', ...와 같이 만든다
| Code
for i in range(1, 51):
    with open(str(i)+"Week.txt", "w", encoding="utf8") as report_file:
        report_file.write("- {0}Week Report -".format(i))
        report_file.write("\nDepartment :")
        report_file.write("\nName :")
        report_file.write("\nBrief :")

read_file = open("1Week.txt", "r")
print(read_file.read())
read_file.close()
| 반성점
입출력 포맷을 당장 쓸 수 없는 상황이라고 가볍게 강의를 본 내 자신을 반성한다.
강의 요약을 다시 보면서 다시 해보면서 이해를 했다.
나의 가벼운 태도를 항상 조심하기로
[9-1] 클래스
클래스는 빵을 만드는 틀
틀은 하나이지만 그 틀을 이용해서 무한한 빵을 만들 수 있는 것
# 클래스 사용법
'''
class 이름 :
	def __init__( 들어간 인자, 들어간 인자 )
xxxxxx = 이름()

'''

class unit :
    def __init__(self, name, hp, damage):
        self.name = name
        self.hp = hp
        self.damage = damage
        print("{0} Unit has been made".format(self.name))
        print("{0} HP, {1} OP".format(self.hp, self.damage))

marine1 = Unit("Marine", 40, 5)
marine2 = Unit("Marine", 40, 5)
Tank1 = Unit("Tank", 40, 5)
[9-2] __init__
__init__은 생성자이다. 객체를 만들 때 자동으로 호출
객체 : 어떠한 클래스로 만들어지는 것, 클래스의 인스턴스라고 표현
객체를 생성할 때는 기본적으로 init 함수의 정의된 개수와 동일하게 해야함 (self 제외)
class unit :
    def __init__(self, name, hp, damage):
        self.name = name
        self.hp = hp
        self.damage = damage
        print("{0} Unit has been made".format(self.name))
        print("{0} HP, {1} OP".format(self.hp, self.damage))

marine1 = unit("Marine") # 이름만 포함하기 때문에 실행 X
marine2 = unit("Marine", 40) # 이름, HP만 포함하기 때문에 실행 X
[9-3] 멤버변수
# 멤버변수
# 클래스 내에서 정의된 변수
# 아래 클래스에서 name, hp, damage를 칭함

class unit :
    def __init__(self, name, hp, damage):
        self.name = name
        self.hp = hp
        self.damage = damage
        print("{0} Unit has been made".format(self.name))
        print("{0} HP, {1} OP".format(self.hp, self.damage))

# 레이스 : 공중 유닛, 비행기, 클로킹 (상대방에게 보이지 않음)
wraith1 = unit("wraith", 80, 5)
print("Unit name : {0}, OP : {1}".format(wraith1.name, wraith1.damage))
# (.) 으로 멤버변수에 접근할 수 있다 (외부에서)

# 마인드 컨트롤 : 상대방 유닛을 내 것으로 만드는 것
wraith2 = unit("Deprived wraith", 80, 5)
wraith2.clocking = True

if wraith2.clocking == True :
    print("{0} is on clocking mode".format(wraith2.name))
# 파이썬에서는 어떠한 객체에 추가로 외부에서 변수를 만들어 쓸 수 있다
# 클래스 외부에서 내가 원하는 변수를 확장할 수 있다
# 확장된 변수는 내가 확장한 객체에서만
[9-4] 메소드
class unit :
    def __init__(self, name, hp, damage):
        self.name = name
        self.hp = hp
        self.damage = damage
        print("{0} Unit has been made".format(self.name))
        print("{0} HP, {1} OP".format(self.hp, self.damage))

class attackUnit :
    def __init__(self, name, hp, damage):
        self.name = name
        self.hp = hp
        self.damage = damage

    def attack(self, location):
        print("{0} : executed attack on {1} [OP {2}]".format(self.name, location, self.damage))

    def damaged(self, damage):
        print("{0} : received {1} damage".format(self.name, damage))
        self.hp -= damage
        print("{0} : HP status : {1}".format(self.name, self.hp))
        if self.hp <= 0:
            print("{0} : has been destroyed".format(self.name))

# 파이어뱃 : 공격유닛, 화염방사기
fbat1 = attackUnit("firebat", 50, 16)
fbat1.attack("West")

# 공격 2번 받음
fbat1.damaged(25)
fbat1.damaged(25)
[9-5] 상속
# 일반 유닛
class unit :
    def __init__(self, name, hp):
        self.name = name
        self.hp = hp

# 공격 유닛
class attackUnit(unit) :
    def __init__(self, name, hp, damage):
        unit.__init__(self, name, hp)
        self.damage = damage

# 공격 유닛이 일반 유닛으로부터 상속 받는다
[9-6] 다중 상속
상속을 받아오는 클래스를 부모, 상속 받는 클래스를 자식
다중 상속이란 부모가 둘 이상일 경우 ( 여러 곳에서 상속 받는 것 )
class unit :
    def __init__(self, name, hp):
        self.name = name
        self.hp = hp

class attackUnit(unit) :
    def __init__(self, name, hp, damage):
        unit.__init__(self, name, hp)
        self.damage = damage

    def attack(self, location):
        print("{0} : executed attack on {1} [OP {2}]".format(self.name, location, self.damage))

    def damaged(self, damage):
        print("{0} : received {1} damage".format(self.name, damage))
        self.hp -= damage
        print("{0} : HP status : {1}".format(self.name, self.hp))
        if self.hp <= 0:
            print("{0} : has been destroyed".format(self.name))

#공중 유닛 클래스
class flyable:
    def __init__(self, flying_speed):
        self.flying_speed = flying_speed

    def fly(self, name, location):
        print("{0} : flying to {1} [Speed:{2}]".format(name, location, self.flying_speed))

#공중 공격 유닛 클래스
class flyableAttackUnit(attackUnit, flyable):
    def __init__(self, name, hp, damage, flying_speed):
        attackUnit.__init__(self, name, hp, damage)
        flyable.__init__(self, flying_speed)

# 발키리 : 공중 공격 유닛, 한번에 14발 미사일 발사
valkyrie = flyableAttackUnit("Valkyrie", 200, 6, 5)
valkyrie.fly(valkyrie.name, "West")
[9-7] 메소드 오버라이딩
class unit :
    def __init__(self, name, hp, speed):
        self.name = name
        self.hp = hp
        self.speed = speed

    def move(self, location):
        print("[Ground Unit Move]")
        print("{0} : move to {1} [Speed:{2}]".format(self.name, location, self.speed))

class attackUnit(unit) :
    def __init__(self, name, hp, speed, damage):
        unit.__init__(self, name, hp, speed)
        self.damage = damage

    def attack(self, location):
        print("{0} : executed attack on {1} [OP {2}]".format(self.name, location, self.damage))

    def damaged(self, damage):
        print("{0} : received {1} damage".format(self.name, damage))
        self.hp -= damage
        print("{0} : HP status : {1}".format(self.name, self.hp))
        if self.hp <= 0:
            print("{0} : has been destroyed".format(self.name))

class flyable:
    def __init__(self, flying_speed):
        self.flying_speed = flying_speed

    def fly(self, name, location):
        print("{0} : flying to {1} [Speed:{2}]".format(name, location, self.flying_speed))

class flyableAttackUnit(attackUnit, flyable):
    def __init__(self, name, hp, damage, flying_speed):
        attackUnit.__init__(self, name, hp, 0, damage) # Ground speed considered 0
        flyable.__init__(self, flying_speed)

    # 공중 공격 유닛 클래스에서 move 메서드를 오버라이딩함으로써
    # move()로 fly를 호출할 수 있게 만들었다
    # move()를 재정의한다
    def move(self, location):
        print("[Aviation Unit Move]")
        self.fly(self.name, location)

# 벌쳐 : 지상 유닛, 높은 속도
vulture = attackUnit("vulture", 80, 10, 20)

# 배틀크루져 : 공중 유닛, 높은 체력, 높은 공격력
battlecruiser = flyableAttackUnit("battlecruiser", 500, 25, 3)

vulture.move("North")
battlecruiser.move("West" )
[9-8] pass
pass : 아무것도 안하고 넘기는 것 / init 함수 내에서 완성을 하지 않고도 완성을 한 것처럼 보여지는 것
class unit :
    def __init__(self, name, hp, speed):
        self.name = name
        self.hp = hp
        self.speed = speed

    def move(self, location):
        print("[Ground Unit Move]")
        print("{0} : move to {1} [Speed:{2}]".format(self.name, location, self.speed))

class attackUnit(unit) :
    def __init__(self, name, hp, speed, damage):
        unit.__init__(self, name, hp, speed)
        self.damage = damage

    def attack(self, location):
        print("{0} : executed attack on {1} [OP {2}]".format(self.name, location, self.damage))

    def damaged(self, damage):
        print("{0} : received {1} damage".format(self.name, damage))
        self.hp -= damage
        print("{0} : HP status : {1}".format(self.name, self.hp))
        if self.hp <= 0:
            print("{0} : has been destroyed".format(self.name))

class flyable:
    def __init__(self, flying_speed):
        self.flying_speed = flying_speed

    def fly(self, name, location):
        print("{0} : flying to {1} [Speed:{2}]".format(name, location, self.flying_speed))

class flyableAttackUnit(attackUnit, flyable):
    def __init__(self, name, hp, damage, flying_speed):
        attackUnit.__init__(self, name, hp, 0, damage) # Ground speed considered 0
        flyable.__init__(self, flying_speed)

    def move(self, location):
        print("[Aviation Unit Move]")
        self.fly(self.name, location)

#Building
class buildingUnit(unit):
    def __init__(self, name, hp, location):
        pass

#Supply depot
supply_depot = buildingUnit("supply_depot", 500, "West")

def game_start():
    print("[!] New game begins")

def game_over():
    pass

game_start()
game_over()
[9-9] super
class unit :
    def __init__(self, name, hp, speed):
        self.name = name
        self.hp = hp
        self.speed = speed

    def move(self, location):
        print("[Ground Unit Move]")
        print("{0} : move to {1} [Speed:{2}]".format(self.name, location, self.speed))

class attackUnit(unit) :
    def __init__(self, name, hp, speed, damage):
        unit.__init__(self, name, hp, speed)
        self.damage = damage

    def attack(self, location):
        print("{0} : executed attack on {1} [OP {2}]".format(self.name, location, self.damage))

    def damaged(self, damage):
        print("{0} : received {1} damage".format(self.name, damage))
        self.hp -= damage
        print("{0} : HP status : {1}".format(self.name, self.hp))
        if self.hp <= 0:
            print("{0} : has been destroyed".format(self.name))

class flyable:
    def __init__(self, flying_speed):
        self.flying_speed = flying_speed

    def fly(self, name, location):
        print("{0} : flying to {1} [Speed:{2}]".format(name, location, self.flying_speed))

class flyableAttackUnit(attackUnit, flyable):
    def __init__(self, name, hp, damage, flying_speed):
        attackUnit.__init__(self, name, hp, 0, damage) # Ground speed considered 0
        flyable.__init__(self, flying_speed)

    def move(self, location):
        print("[Aviation Unit Move]")
        self.fly(self.name, location)

#Building
class buildingUnit(unit):
    def __init__(self, name, hp, location):
        # 방법 1
        # unit.__init__(self, name, hp, 0)
        super().__init__(name, hp, 0) # super 쓸때는 () 사용, self 없이
        self.location = location
class Unit:
def __init__(self):
print("Unit create")
class Flyable:
def __init__(self):
print("Flyable create")
class FlyabeUnit(Unit, Flyable):
def __init__(self):
# super().__init__()
Unit.__init__(self)
Flyable.__init__(self)
# 드랍쉽
dropship = FlyabeUnit()
'''
두개 이상의 부모 클래스로부터 다중 상속 받을 시에는
super를 쓰면 순서상에 맨 앞에 클래스에 대해서만 출력이 된다.
So 다중 상속시 / 모든 클래스에 대한 출력값이 필요시
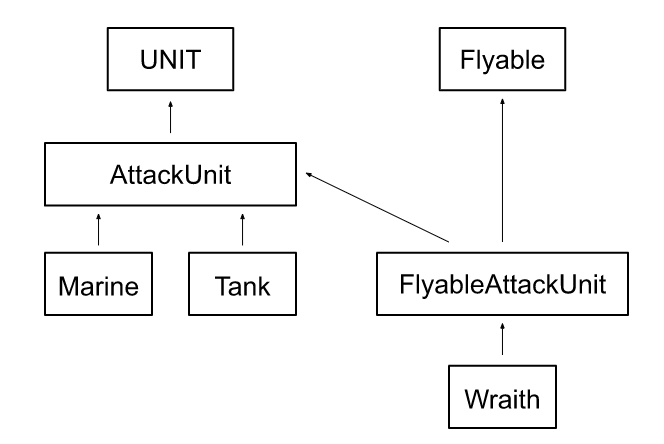
따로 명시적으로 두번을 통해서(클래스.__init__) 한다.[9-10 | 9-11] 스타크래프트 프로젝트 전반전/후반전
from random import * # 데미지 받을 때 랜덤하게 받기 위해 랜덤 패키지 받기

class unit :
    def __init__(self, name, hp, speed):
        self.name = name
        self.hp = hp
        self.speed = speed
        print("{0} Unit has been created".format(name)) # 생성시 문구

    def move(self, location):
        print("[Ground Unit Move]")
        print("{0} : move to {1} [Speed:{2}]".format(self.name, location, self.speed))

    def damaged(self, damage): # 모든 유닛이 공격 받을 수 있기 때문에 unit 클래스로 이동
        print("{0} : received {1} damage".format(self.name, damage))
        self.hp -= damage
        print("{0} : HP status : {1}".format(self.name, self.hp))
        if self.hp <= 0:
            print("{0} : has been destroyed".format(self.name))

class attackUnit(unit) :
    def __init__(self, name, hp, speed, damage):
        unit.__init__(self, name, hp, speed)
        self.damage = damage

    def attack(self, location):
        print("{0} : executed attack on {1} [OP {2}]".format(self.name, location, self.damage))

# Marine
class marine(attackUnit) :
    def __init__(self) :
        attackUnit.__init__(self,"Marine", 40, 1, 5)

    # Stimpack : speed and op speed increase instance temporarily, using hp 10
    def stimpack(self):
        if self.hp >10 :
            self.hp -= 10
            print("{0} : Activated stimpack mode [HP 10 Decreased]".format(self.name))
        else :
            print("{0} : Not enough HP".format(self.name))

# Tank
class tank(attackUnit) :
    # Seize_mode : Unit fixed on point, increase of OP, unavailable to move
    # 시즈모드는 업그레이드하면 모든 탱크에 동일 적용, 고로 특별히 클래스 바로 밑에 선언
    seize_developed = False # 시즈모드 개발 여부

    def __init__(self) :
        attackUnit.__init__(self, "Tank", 150, 1, 35)
        self.seize_mode = False

    def set_seize_mode(self) :

        if tank.seize_developed == False:
            return

        # 현재 시즈모드가 아닐 때 -> 시즈모드
        if self.seize_mode == False:
            print("{0} : activate seize mode".format(self.name))
            self.damage *= 2
            self.seize_status = True

        # 현재 시즈모드일 때 -> 시즈모드 해제
        else :
            print("{0} : deactivate seize mode".format(self.name))
            self.damage /= 2
            self.seize_status = False


class flyable:
    def __init__(self, flying_speed):
        self.flying_speed = flying_speed

    def fly(self, name, location):
        print("{0} : flying to {1} [Speed:{2}]".format(name, location, self.flying_speed))

class flyableAttackUnit(attackUnit, flyable):
    def __init__(self, name, hp, damage, flying_speed):
        attackUnit.__init__(self, name, hp, 0, damage) # Ground speed considered 0
        flyable.__init__(self, flying_speed)

    def move(self, location):
        print("[Aviation Unit Move]")
        self.fly(self.name, location)

# Wraith
class wraith(flyableAttackUnit):
    def __init__(self):
        flyableAttackUnit.__init__(self, "Wraith", 80, 20, 5)
        self.clocked = False # 클로킹 모드 (해제 상태)

    def clocking(self):
        if self.clocked == True : # 클로킹 모드 > 모드 해제
            print("{0} : deactivate clocking mode".format(self.name))
            self.clocked = False
        else : # 클로킹 모드 > 모드 설정
            print("{0} : activate clocking mode".format(self.name))
            self.clocked = True

def game_start():
    print("[!] New game begins")

def game_over():
    print("Player : gg")
    print("[Player] has left the game")

# 게임 시작
game_start()

# 마린 3기
m1 = marine()
m2 = marine()
m3 = marine()

# 탱크 2기
t1 = tank()
t2 = tank()

# 레이스 1기
w1 = wraith()

# 유닛 일관 관리 (유닛 리스트 생성, 생성된 모든 유닛 리스트로 append(추가))
attack_units = []
attack_units.append(m1)
attack_units.append(m2)
attack_units.append(m3)
attack_units.append(t1)
attack_units.append(t2)
attack_units.append(w1)

# 전군 이동
for unit in attack_units:
    unit.move("North West")

# 탱크 시즈모드 개발
tank.seize_developed = True
print("[!] Tank developed seize mode")

# 공격 모드 준비 ( 마린: 스팀팩, 탱크 : 시즈모드, 레이스 : 클로킹 )
# isintance(확인할 대상, 여부 확인 하는 클래스) = 만들어진 객체가 클래스의 객체인지 확인하는 것
for unit in attack_units:
    if isinstance(unit, marine) :
        unit.stimpack()
    elif isinstance(unit, tank) :
        unit.set_seize_mode()
    elif isinstance(unit, wraith):
        unit.clocking()

# 전군 공격
for unit in attack_units:
    unit.attack("North West")

# 전군 피해
for unit in attack_units:
    unit.damaged(randint(5,21))

# 게임 종료
game_over()
| 클래스 & 객체의 관계도
[9-12] 퀴즈
| Quiz
주제 : 주어진 코드를 활용하여 부동산 프로그램을 작성

출력 예제 :
총 3대의 매물이 있습니다.
강남 아파트 매매 10억 2010년
마포 오피스텔 전세 5억 2007년
송파 빌라 월세 500/50 2000년

코드 :
class house:
	# 매물 초기화
    def __init__(self, location, house_type, deal_type, price, completion_year):
    	pass

	# 매물 정보 표시
    def show_detail(self):
    	pass
| 내 코드
class house:
    def __init__(self, location, house_type, deal_type, price, completion_year):
        self.location = location
        self.house_type = house_type
        self.deal_type = deal_type
        self.price = price
        self.completion_year = completion_year

    def show_detail(self):
        print("{0} {1} {2} {3} {4}년".format(self.location, self.house_type,\
        self.deal_type, self.price, self.completion_year))


h1 = house("강남", "아파트", "매매", "10억", 2010)
h2 = house("마포", "오피스텔", "전세", "5억", 2017)
h3 = house("송파", "빌라", "월세", "500/50", 2000)

house_list = []
house_list.append(h1)
house_list.append(h2)
house_list.append(h3)

print("총 {0}대의 매물이 있습니다".format(len(house_list)))

for house in house_list:
    house.show_detail()
| Clean code (from the vid)
class house:
    def __init__(self, location, house_type, deal_type, price, completion_year):
        self.location = location
        self.house_type = house_type
        self.deal_type = deal_type
        self.price = price
        self.completion_year = completion_year

    def show_detail(self):
        print(self.location, self.house_type,\
        self.deal_type, self.price, self.completion_year)


houses = []
h1 = house("강남", "아파트", "매매", "10억", "2010년")
h2 = house("마포", "오피스텔", "전세", "5억", "2017년")
h3 = house("송파", "빌라", "월세", "500/50", "2000년")

houses.append(h1)
houses.append(h2)
houses.append(h3)

print("총 {0}대의 매물이 있습니다".format(len(houses)))

for house in house_list:
    house.show_detail()
| 반성점
1. show_detail() 함수에서 굳이 format을 통한 출력을 쓸 필요가 없이
바로 self.xxx, self.xxx로 작성했다면 더욱 간결하게 코드가 나왔을 것
[10-1] 예외처리
예외처리 : 어떤 에러가 발생했을 때 하는 처리
try:
    print("Calculator of division")
    nums = []
    nums.append(int(input("Insert #1 Number : ")))
    nums.append(int(input("Insert #2 Number : ")))
    # nums.append(int(nums[0]/nums[1]))
    print("{0} / {1} = {2}".format(nums[0], nums[1], nums[2]))

#1 : 일어나는 특정 오류에 대한 것 발생 시 출력문 실행
except ValueError:
    print("[!] Wrong value inserted")
#2 : 일어나는 특정 오류에 대한 설명을 출력
except ZeroDivisionError as err:
    print(err)
#3 : 일어나는 모든 오류에 대한 설명을 출력
except Exception as err:
    print("[!] Unknown error")
    print(err)
#4 : 일어나는 모든 오류 발생 시 출력문 실행
except:
    print("[!] Unknown error")
[10-2] 에러 발생시키기
try:
    print("Calculator for single digits")
    num1 = int(input("Insert #1 number : "))
    num2 = int(input("Insert #2 number : "))
    if num1 >= 10 or num2 >= 10:
        raise ValueError
    print("{0}/{1}={2}".format(num1, num2, int(num1/num2)))
except ValueError:
    print("Wrong value inserted. Only single digits available")

# num1, num2가 10을 넘으면 ValueError을 raise하게 하고
# 아래 except문으로 빠져 나온 후에 예외처리 실ㅇ행
[10-3] 사용자 정의 예외처리
class BigNumberError(Exception):
    def __init__(self, msg):
        self.msg = msg

    def __str__(self):
        return self.msg

try:
    print("Calculator for single digits")
    num1 = int(input("Insert #1 number : "))
    num2 = int(input("Insert #2 number : "))
    if num1 >= 10 or num2 >= 10:
        raise BigNumberError("Inserted Num : {0}, {1}".format(num1,num2))
        # () 안에 출력하려는 메세지를 작성한다
    print("{0}/{1}={2}".format(num1, num2, int(num1/num2)))
# except ValueError:
#    print("Wrong value inserted. Single digits Only")
except BigNumberError as err:
    print("Error occured. Single digits Only")
    print(err)

'''
BigNumberError가 발생했을 때, 정의한 메세지("Inserted~~format(num1,num2)")를
def __init__에 전달하고 메시지를 가지고 있다가
(msg로 받고 init함수 실행됨으로써 self.msg로 갖고 있다가)
except문 실행이 될 때 메시지를 출력을 하는 것
'''
[10-4] finally
예외처리문에서 정상적으로 코드가 실행이 되던, 오류처리가 되던 무조건 실행되는 문
try문 마지막에 작성
에러 발생 시 프로그램이 강제종료되는 것을 막음으로써 프로그램의 완성도를 높임
class BigNumberError(Exception):
    def __init__(self, msg):
        self.msg = msg

    def __str__(self):
        return self.msg

try:
    print("Calculator for single digits")
    num1 = int(input("Insert #1 number : "))
    num2 = int(input("Insert #2 number : "))
    if num1 >= 10 or num2 >= 10:
        raise BigNumberError("Inserted Num : {0}, {1}".format(num1,num2))
    print("{0}/{1}={2}".format(num1, num2, int(num1/num2)))
# except ValueError:
#    print("Wrong value inserted. Single digits Only")
except BigNumberError as err:
    print("Error occured. Single digits Only")
    print(err)
finally:
    print("Thank you for your use")
[10-5] 퀴즈
| Quiz
주제 :
대기손님이 항상 있는 치킨집이 있다.
대기 손님 주문 응대로 인한 치킨 요리 시간을 줄이고자 자동 주문 시스템을 제작하였다.
시스템 코드를 확인하고 적절한 예외처리 구문을 넣어라

조건 1 :
	1보다 작거나 숫자가 아닌 입력값이 들어올 때는 ValueError로 처리
	출력 메시지 : "잘못된 값을 입력하였습니다"
조건 2 :
	대기 손님이 주문할 수 있는 총 치킨량을 10마리로 한정
	치킨 소진 시 사용자 정의 에러[SoldOutError]를 발생시키고 프로그램 종료
	출력 메시지 : "재고가 소진되어 더 이상 주문을 받지 않습니다."

[코드]
chicken = 10
waiting = 1

while(True):
    print("[남은 치킨 : {0}]".format(chicken))
    order = int(input("치킨 몇 마리 주문하시겠습니까?"))
    if order > chicken:
        print("재료가 부족합니다")
    else :
        print("[대기번호 : {0}] {1} 마리 주문이 완료되었습니다".format(waiting, order))
        waiting +=1
        chicken -= order
| 내 코드
class VauleError(Exception):
    def __init__(self,msg):
        self.msg = msg

    def __str__(self):
        return self.msg

class SoldOutError(Exception):
    def __init__(self,msg):
        self.msg = msg

    def __str__(self):
        return self.msg

chicken = 10
waiting = 1

try:
    while(True):
        print("[남은 치킨 : {0}]".format(chicken))
        order = int(input("몇 마리 주문하시겠습니까? :"))
        if order > chicken:
           print("재료가 부족합니다")
        elif order < 1 or str:
            raise ValueError
        elif chicken ==0:
            raise SoldOutError
        else:
            print("[대기번호 : {0}] {1} 마리 주문이 완료되었습니다".format(waiting, order))
            waiting += 1
            chicken -= order

except ValueError:
    print("잘못된 값을 입력하였습니다")

except SoldOutError:
    print("재고가 소진되어 더 이상 주문을 받지 않습니다")
프로그램 실행 오류 이유 :
1. int값을 입력하는데도 ValueError로 처리된 이유
>
(elif < 1 or str:), <1은 1보다 작은 수는 받지 않는 것이지만 str은 잘못되었다.
숫자를 넣어도 str으로 값을 전달 받기 때문에 모든 값이 ValueError로 처리된 것이다.
2. 남은 치킨이 0이 되어도 SoldOutError로 처리가 안된 이유
>
(elif chicken ==0)이 (else: ~~ chicken -=order)보다 위에 있기 때문이다.
chicken 값이 0인지 확인하는 것은 우선 오더값을 받고
그것으로 남은 치킨의 양을 업데이트 한 후에 해야 순서가 맞는 것이기 때문에 오류가 난 것
3. elif가 아닌 if
SoldOutError의 elif가 오류가 발생한 이유는 문단이 다르기 때문이다.
if, elif, else는 input을 받고 그것을 처리하는 메인 문단이고
chicken 값이 0과 같은지 확인하는 것은 별도
| Clean Code (from the vid)
class SoldOutError(Exception):
    pass

chicken = 10
waiting = 1

while(True):
    try:
        print("[남은 치킨 : {0}]".format(chicken))
        order = int(input("몇 마리 주문하시겠습니까? :"))
        if order > chicken:
           print("재료가 부족합니다")
        elif order < 1 :
            raise ValueError
        else:
            print("[대기번호 : {0}] {1} 마리 주문이 완료되었습니다".format(waiting, order))
            waiting += 1
            chicken -= order

        if chicken ==0:
            raise SoldOutError

    except ValueError:
        print("잘못된 값을 입력하였습니다")
    except SoldOutError:
        print("재고가 소진되어 더 이상 주문을 받지 않습니다")
        break
| 반성점
( 위에 프로그램 실행 오류 이유 참고 )
1번의 경우에는 input값은 모두(어떠한 형태라도) str값으로 받는다는 기본적인 사실을 까먹은 실수이다.
제일 기본적인 것들이 중요하다는 생각이 든다.
2번의 경우에는 위에서 아래로 프로그램이 실행될 때, 생각을 해보면 값이 할당되지도 않았는데
그것을 확인한다는 말이 안되는 것이기 때문에 하지 않아도 되는 실수였으나
코드를 구현해낸다는 생각에 사로잡혀서 실수한 것 같다.
단순히 코드를 구현하는데 집착하지 않고 프로그램의 흐름을 생각할 수 있는 자세를 갖추어야겠다.
3번의 경우에는 몰랐던 사실이었다.
3번의 문제로 인해서 (if를 별도로 해도된다는 것을 모른 사실) 2번의 문제가 발생한 부분도 있지만
다음부터는 잘못하지않겠다.
[11-1] 모듈
필요한 것들끼리 부품처럼 잘 만들어진 파일
이런 식으로 만드는 것을 모듈화라고 한다
함수 정의나 클래스등의 파이썬 문장들을 담고 있는 파일을 모듈이라고 한다.
확장자가 .py이다
모듈은 내가 쓰려는 파일과 같은 경로 혹은
파이썬 라이브러리가 모여있는 폴더에 있어야 사용 가능 (혹은 같은 Workspace)
# 일반 가격
def price(people):
    print("Price of {0} tickets for the movie is {1}".format(people, people*10000))

# 조조 할인 가격
def price_morning(people):
    print("Price of {0} tickets for the movie with early morning discount is {1}".format(people, people*6000))

# 군인 할인 가격
def price_army(people):
    print("Price of {0} tickets for the movie with army discount is {1}".format(people, people*4000))
# 방법 1
# 모듈 가져오기
# import theater_module
# 방법 2
# 모듈을 가져오는데 mv라는 이름으로 바꿔서 가져오기
# import theater_module as mv
# 방법 3
# 모듈 가져오기
# from theater_module import *
# 방법 4
# 모듈 내에 있는 price라는 함수만 가져오기
# from theater_module import price
# 방법 5
# 모듈을 가져오는데 price_army라는 함수를 price라는 이름으로 바꿔서 가져오기
# from theater_module import price_army as price[11-2] 패키지
패키지 = 모듈들을 모아둔 집합 = 하나의 디렉토리에 여러 모듈들을 모아둔 것
practice.py는 패키지 밖에 있고,
나머지 thailand.py / vietnam.py / __init__.py을 폴더에 담았으며
그 폴더를 패키지라고 한다.
| travel.py
# practice.py

import travel.thailand # travel 패키지 안에 있는 thailand 모듈을 import한 것
trip_to = travel.thailand.ThailandPackage() # 패키지 안 모듈 안 클래스 사용한 것
trip_to.detail()

'''
import문에서 import 할 수 있는 것은 모듈, 패키지만이다.
함수나 클래스를 직접 import할 수 없다

BUT from import문에서는 클래스, 함수 import 가능하다
	> 모듈을 import하고 그 중에서 특정 클래스/함수 import 가능
Ex)
	from travel.thailand import ThailandPackage # 모듈에서 클래스 import
	from travel import vietnam # 패키지에서 모듈 import
'''
# thailand.py ( 태국 모듈 )
class ThailandPackage:
def detail(self):
print("[Thailand Package 5Day] Bangkok, Pattaya Trip (Night Market) 500USD")# vietnam.py ( 베트남 모듈 )
class VietnamPackage:
def detail(self):
print("[Vietnam Package 5Day] Danang Trip for parents 600USD")[11-3] __all__
# practice.py

from travel import *
trip_to = vietnam.VietnamPackage()
trip_to.detail()

'''
>
오류가 난다. 문법 상에서 공개 범위를 설정해줘야한다.
패키지 안에서 원하는 것만 공개를 하고 원하지 않는 것은 비공개 설정이 가능하다
'''
# __init__.py
__all__ = ["vietnam", "thailand"]
'''
__all__이라는 리스트 안에 공개를 할 모듈들을 집어 넣는 것
만약 vietnam.py 모듈은 공개하고 싶지 않으면 리스트에서 그냥 빼면 된다
'''[11-4] 모듈 직접 실행
# thailand.py

class ThailandPackage:
    def detail(self):
        print("[Thailand Package 5Day] Bangkok, Pattaya Trip (Night Market) 500USD")

if __name__ == "__main__":
    print("Directley activated Thailand module")
    print("This line activated only when module is runned directley")
    trip_to = ThailandPackage()
    trip_to.detail

else:
    print("Externally activated Thailand module")

'''
if __name__ == "__main__" 은 무엇인가?
__name__의 뜻은 "이미 있는" 변수로써, 해당 파이썬 파일의 이름, 즉 모듈의 이름을 담게된다.
BUT
"해당 파일 안에서" 파일을 실행시키면 해당 파이썬 파일의 이름이 아닌,
"__main__"이라는 값이 되도록 정해져있는 것이다
'''
[11-5] 패키지, 모듈 위치
모듈을 호출하는 혹은 패키지를 호출하는 동일한 폴더에 있거나,
파이썬 내에 라이브러리가 모여있는 폴더에 있어야 사용이 가능하다.
# practice.py

import inspect
print(inspect.getfile(thailand))

# inspect.getfile() 을 통해서 thailand라는 모듈(파일)이 어떤 위치(경로)에 있는지 알 수 있다.
[11-6] pip install
PyPI · The Python Package Index
The Python Package Index (PyPI) is a repository of software for the Python programming language.
pypi.org
사이트 접속 후 이미 만들어져있는 패키지 파일 가져올 수 있다.
pip list를 실행하면 현재 설치되어 있는 패키지들을 볼 수 있다
pip show (패키지 이름)를 실행하면 패키지에 대한 정보를 볼 수 있다.
pip install --upgrade (패키지 이름)을 실행하면 패키지의 최신 버전으로 업그레이드 할 수 있다.
pip uninstall (패키지 이름)을 실행하면 패키지를 삭제할 수 있다.
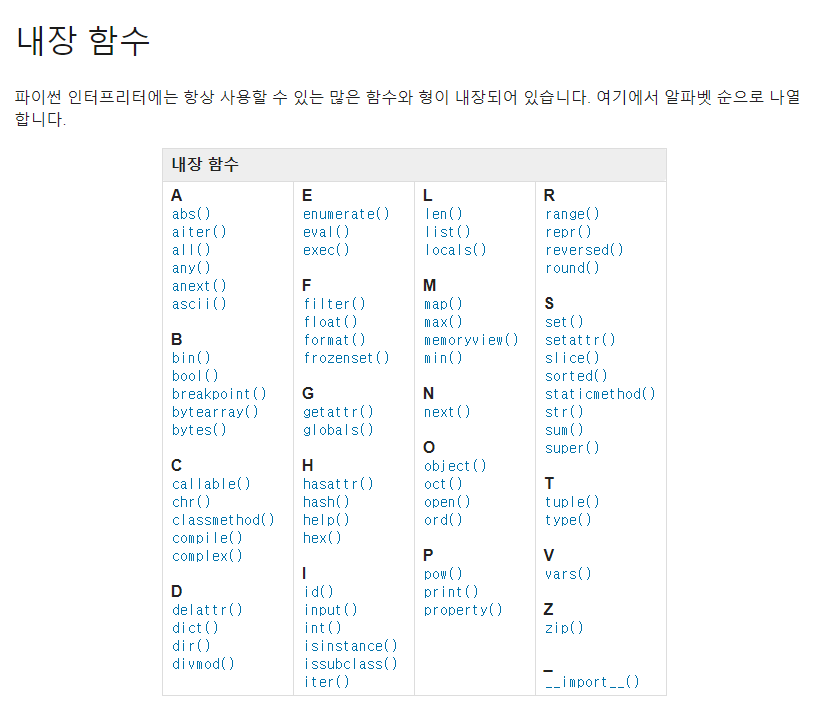
[11-7] 내장 함수
함수가 내장되어 있기 때문에 별도로 import할 필요 없이 바로 사용할 수 있다
[11-8] 외장 함수
내장 함수와 다르게 직접 import를 한 후에 사용해야하는 함수
https://docs.python.org/3/py-modindex.html
Python Module Index — Python 3.10.5 documentation
numbers Numeric abstract base classes (Complex, Real, Integral, etc.).
docs.python.org
# 외장 함수 사용 예시

# glob : 경로 내의 폴더 / 파일 목록 조회 (such as 윈도우의 dir)
import glob
print(glob.glob("*.py")) # 확장자가 py인 모든 파일

# os : 운영체제에서 제공하는 기본 기능
import os
print(os.getcwd()) # 현재 디렉토리

folder = "sample_dir"

if os.path.exists(folder):
    print("Already Existing Folder")
    # 삭제 프로세스 추가 시
    # os.rmdir(folder)
    # print(folder, "Removed")
else:
    os.makedirs(folder) # 폴더 생성
    print(folder, "Created")

# time : 시간 관련 함수
import time
print(time.localtime())
print(time.strftime("%Y-%m-%d %H:%M:%S"))

# datetime
	# 두 날짜 사이의 간격 : time delta
today = datetime.date.today()
td = datetime.timedelta(days=100)
print("100days from the day we met is", today + td)
[11-9] 퀴즈 #10
| Quiz
주제 : 프로젝트 내에 나만의 시그니처를 남기는 모듈을 만드시오

조건 : 모듈 파일명은 byme.py로 작성

모들 사용 예제 :
import byme
byme.sign()

출력 예제 :
이 프로그램은 나도코딩에 의해 만들어졌습니다.
유튜브 : http://youtube.com
이메일 : harveyspectkim@gmail.com
| 내 코드
# 파일명 : byme.py

def sign():
    print("This program is made by Hero-Kim")
    print("Youtube : http://youtube.com")
    print("Email : harveyspectkim@gmail.com")
| Clean Code (from the vid)
내 코드와 동일
마무리하며
돌이켜서 생각해보면 6시간 강의를 공부하는데 왜 이렇게 오래 걸린 것일까라고
자신을 자책하기도 하지만 그래도 이번 강의를 끝냈다는 점에서 기분이 좋다.
기초 수준의 강의로써 파이썬을 공부하는데 너무 좋았다고 생각이 들며
중간중간 더 궁금한 것들을 찾아보며 조금 더 프로그래밍에 대한 이해도가 늘어난듯한 느낌도 든다.
(물론 대단한 수준의 이해도는 아니겠지만)
이렇게 차근차근 흥미와 열정을 잃어가지 않으면서 꾸준히, 그리고 열심히 프로그래밍 공부를 해나가고 싶다.
ps. 부대의 훈련이 너무 많다고 하면 변명인가 헤헷
Reference :
파이썬 코딩 무료 강의 (기본편) - 6시간 뒤면 여러분도 개발자가 될 수 있어요 [나도코딩]
'[Programming] > [Language]' 카테고리의 다른 글
| [Python] 나도코딩_활용편2 / Finished 22.09.17 (0) | 2022.08.18 |
|---|---|
| [Python] 나도코딩_활용편1 / Finished 22.08.17 (0) | 2022.07.18 |
| [Java] Ch13. 예외 처리 / 객체 지향 프로그래밍 중급 / K-Digital Credit Java / Summary (0) | 2022.06.01 |
| [Java] Ch12. 내부 클래스, 람다식, 스트림 / 객체 지향 프로그래밍 중급 / K-Digital Credit Java / Summary (0) | 2022.05.29 |
| [Java] Ch11. 컬렉션 프레임 워크 / 객체 지향 프로그래밍 중급 / K-Digital Credit Java / Summary (0) | 2022.05.25 |